101 Survival Hacks in a Pinch
This post may contain affiliate links. If you buy through them, I may earn a small commission at no extra cost to you.
In life, emergencies seldom announce their arrival. When disaster strikes—whether it’s a natural calamity, unexpected wilderness stranding, or urban infrastructure collapse—the line between survival and catastrophe often hinges not on expensive gear or specialized training but on creative improvisation.
How Can I Apply Survival Hacks to Everyday Objects?
I’ve been researching this question. I found that the ability to look at everyday objects and reimagine their potential may very well be our most valuable asset when traditional resources become unavailable. This guide catalogs 101 innovative approaches to survival challenges using items you might already have access to, even in dire circumstances.
The essence of survival improvisation lies in understanding core principles rather than memorizing specific techniques. A plastic bag isn’t just a container; it’s a potential shelter, a water collection device, or emergency gloves.
A simple soda can transforms into a fishing lure, cooking vessel, or signaling mirror. This mental flexibility—seeing beyond an object’s intended purpose to its survival applications—can prove invaluable when conventional solutions aren’t within reach.
The modern world has conditioned many of us to expect immediate solutions, specialized tools for specific problems, and the constant availability of essential services.
But history and countless survival stories remind us that humans thrived long before specialized gear existed. Our ancestors and even our seniors survived by understanding the principles of heat, shelter, water purification, and food acquisition—then applying available materials to meet these needs.
As you explore these improvisational techniques, remember they represent backup strategies, not primary plans. The optimal approach always involves proper preparation, appropriate gear, and developed skills.
However, knowledge of improvisation provides a crucial safety net when primary systems fail. Adaptability often trumps specialized knowledge in survival scenarios, and resourcefulness frequently outweighs high-tech equipment.
This compilation offers solutions across fourteen critical survival domains, from creating emergency shelters to improvised self-defense. While none of these hacks replace proper preparation, they may provide that crucial bridge between disaster and rescue, turning ordinary objects into extraordinary survival tools when you find yourself in a pinch.
Shelter Hacks
The fundamental survival equation begins with shelter—before water, before food, before signaling for rescue. In extreme environments, exposure can become lethal within hours, while lack of water might take days to become critical.
Despite this reality, shelter remains the most frequently overlooked survival necessity, with many individuals focusing instead on food stockpiling or other less immediate concerns.
When standard shelter options vanish, your ability to improvise becomes crucial. The environment itself often provides materials that, with creativity and basic understanding of thermal principles, can be transformed into life-saving refuges.
However, improvisational shelters seldom provide the comprehensive protection of purpose-built alternatives. They typically lack durability against sustained harsh conditions, offer minimal insulation, and could be problematic in high winds or heavy precipitation.
These shelter hacks should be considered emergency stopgaps—temporary solutions bridging the gap between exposure and proper protection. In an actual survival scenario, immediately improve your improvisational shelter or seek more substantial alternatives while your energy reserves remain adequate.
The psychological comfort of even basic shelter dramatically improves decision-making capacity in crises, making these improvisation skills valuable even when better options might eventually become available.
#1 – Trash Bag Tent
Transform a large garbage bag into an emergency shelter by carefully cutting along the seams to create a flat, waterproof sheet. To construct a simple lean-to, secure one edge to tree branches or rocks at waist height, then stake the opposite edge to the ground with stones or sticks.
Alternatively, drape it over a line between two trees for a rudimentary ridge tent. In precipitation, the plastic sheeting will channel water away while providing a wind barrier. For enhanced stability, reinforce attachment points with small sticks poked through the plastic and tied with cordage.
#2 – Car Window Reflectors
Repurpose automotive sunshades—those reflective folding panels designed to keep vehicles cool—as survival shelter insulation. When positioned correctly, the metallic surface effectively reflects up to 90% of radiant body heat back toward you.
Line the interior walls of any improvised shelter with these reflectors, shiny side facing inward. Place one beneath your sleeping area in cold environments to minimize ground heat loss. For maximum effectiveness, create an enclosed space where the reflective surface surrounds you on multiple sides, establishing a heat-retention pocket.
#3 – Cardboard Box Shelter
Discarded cardboard boxes can be utilized as improvised urban shelter materials. Large appliance boxes can serve as standalone emergency shelters when laid on their sides, with the opening positioned away from prevailing winds. For enhanced weather resistance, layer multiple flattened boxes to create thicker walls and ceiling sections.
Use duct tape or cordage to secure seams and reinforce structural weak points. Add a layer of plastic sheeting over the exterior to improve water resistance. Fill gaps with crumpled newspaper for insulation. This approach proves especially valuable during urban emergencies when traditional shelters become unavailable.
#4 – Umbrella Shelter
Convert a standard umbrella into a compact survival shelter by securing the handle to a tree branch or improvised stake at face height. Position the canopy at a 45-degree angle to maximize rain runoff and create a protected space beneath.
Enhance this basic structure by draping additional material (poncho, plastic sheeting, etc.) from the outer edges to the ground, creating a conical shelter. The umbrella’s rigid frame provides structural integrity, while the waterproof canopy delivers immediate overhead protection. It is most effective as a temporary individual shelter during sudden precipitation or as a supplement to larger group shelters.
#5 – Shower Curtain Tarp
Repurpose a shower curtain or liner into a versatile survival tarp. With dimensions typically reaching 6’×6′, these waterproof sheets provide adequate coverage for individual shelter construction.
The reinforced grommets along the upper edge facilitate easy attachment to support structures using cordage, while the waterproof vinyl or polyester material effectively repels precipitation.
Shower curtains can be configured into various shelter designs, including an A-frame, lean-to, or ground cloth. Their lightweight, compact nature makes them ideal emergency shelter components for bug-out bags or vehicle emergency kits.
#6 – Newspaper Insulation
Newspaper can be utilized as an effective emergency insulation material in several applications. Layer multiple sheets between clothing layers or inside a jacket to create dead air spaces that trap body heat.
When constructing improvised shelters, stuff crumpled newspaper between structural layers to establish insulation zones. For sleeping arrangements, place several layers of newspaper beneath your body to minimize conductive heat loss to the ground.
The cellulose fibers in newspaper create thousands of tiny air pockets that significantly reduce heat transfer, while the thin sheets can be manipulated to fit virtually any space requiring insulation.
#7 – Plastic Bottle Greenhouse
Construct a miniature greenhouse effect using clear plastic bottles to generate heat in cold environments. Cut bottles in half and place them over small plants or tender fire-starting materials.
In direct sunlight, the clear plastic allows solar radiation to enter while restricting the escape of reflected infrared radiation, effectively trapping heat within. Multiple bottles can be connected to create larger warming chambers.
This technique is particularly valuable for warming hands, drying damp fire-starting materials, or providing localized heat for tasks requiring manual dexterity in cold environments.
#8 – Blanket Fort Upgrade
Using strategic reinforcement techniques, elevate the childhood blanket fort concept into a practical emergency shelter. Use duct tape to secure blanket corners to furniture or other anchor points, creating a stable frame.
Reinforce critical junctions with additional tape to prevent collapse. Layer multiple blankets for improved insulation and light-blocking properties. Incorporate foam padding along the floor to minimize heat loss through conduction.
This approach leverages available household materials to create adequate temporary indoor shelter during power outages, heating system failures, or domestic emergencies.
#9 – Emergency Poncho
You can fashion an emergency poncho with minimal modifications from an inexpensive plastic tablecloth. Fold the tablecloth in half, then cut a semicircular opening at the folded center large enough to accommodate your head.
This creates a waterproof covering extending from shoulders to mid-thigh, effectively channeling precipitation away from your core and upper legs. For improved function, use duct tape to reinforce the neck opening and prevent tearing. This ultra-lightweight emergency rain gear can be folded to pocket size, making it ideal for everyday carry or vehicle emergency kits.
#10 – Carpet Scrap Insulation
Salvage discarded carpet fragments to create effective ground insulation in survival shelters. The dense fiber construction significantly reduces conductive heat loss to the ground—the primary heat-loss mechanism during wilderness sleep arrangements.
Position carpet pieces beneath your sleeping area, ideally layered, for increased effectiveness. In long-term shelters, incorporate carpet sections along walls and ceilings to enhance overall insulation.
The synthetic fibers in most modern carpeting resist moisture absorption better than natural alternatives, maintaining insulation properties even in damp conditions—a crucial advantage in extended survival scenarios.
Water Hacks
Water represents perhaps the most critical survival resource after immediate shelter in extreme environments. Without adequate hydration, the human body’s complex systems begin deteriorating rapidly—cognitive function diminishes, physical capabilities decline, and organ systems eventually fail.
Despite water’s abundance on our planet, finding safe drinking sources during emergencies often presents significant challenges. Conventional wisdom suggests humans can survive three days without water, dangerously oversimplifying the reality.
In hot environments or during physical exertion, severe dehydration can become life-threatening within hours. Even mild dehydration dramatically impairs decision-making—precisely when clear thinking becomes most crucial. The improvisational water techniques presented here provide emergency options when conventional sources become contaminated, damaged, or inaccessible.
Remember that improvised water collection and purification methods typically yield limited quantities while requiring significant effort. These approaches should supplement your primary preparations—stored water supplies, commercial filters, or chemical purification options—rather than replace them.
Without proper preparation, you’ll likely be constantly cycling between dehydration and exhausting water acquisition efforts, leaving little energy for other survival priorities.
#11 – Sock Water Filters
Transform a clean cotton sock into an improvised particulate filter to remove debris from contaminated water sources. Fill the sock with alternating layers of fine sand, crushed charcoal from your fire pit, and small gravel.
Suspend this filtration system above a collection container and slowly pour untreated water through. The graduated filtering media progressively removes larger particles, sediment, and some contaminants.
While this method doesn’t eliminate biological pathogens or chemical pollutants, it significantly improves water clarity before boiling or chemical treatment, extending the life of commercial filters and improving the effectiveness of purification methods.
#12 – Plastic Bottle Solar Still
Construct a solar water purifier using a plastic bottle cut horizontally in the middle. Place a small collection container in the bottom half, then pour contaminated water around (not in) this container.
Invert the top half and secure it to create a sealed chamber. In sunlight, evaporation will occur, with pure water condensing on the upper surface and dripping into your collection vessel.
This method effectively removes heavy metals, salt, most pathogens, and chemical contaminants through the distillation process, though production remains slow—expect only a few ounces daily per still.
#13 – Plastic Bag Condensation Collection
Harvest plant transpiration water by securing a clear plastic bag around leafy, non-poisonous vegetation. As plants release moisture through leaves, water vapor becomes trapped within the bag, condensing on the interior surface before dripping into a collection area.
For optimal results, place a small stone in the bag’s lowest corner to create a collection point and secure the opening tightly around branches using cordage. This passive collection method works continuously throughout daylight hours, requiring no additional energy input while producing surprisingly clean water that requires minimal additional treatment.
#14 – Cotton Cloth Water Wick
Utilize the capillary action of cotton fabric to access water from sources too narrow or shallow for conventional collection. Insert one end of a cotton strip into the water source while positioning the opposite end inside your collection container at a lower elevation.
Water molecules will travel along the fabric through capillary action, eventually dripping into your collection vessel. This technique proves invaluable for accessing water from crevices, tree hollows, or shallow seeps where direct collection proves impossible. The process operates continuously without surveillance, though flow rates remain relatively slow.
#15 – Coffee Filter Water Purification
Employ paper coffee filters as practical pre-treatment tools for contaminated water. The fine, porous structure efficiently removes sediment, particulates, and floating debris that would otherwise clog more sophisticated filtration systems.
For increased effectiveness, fold the filter multiple times to create additional filtering layers, then secure it over your collection container using cordage or a rubber band. While not removing pathogens or chemical contaminants, this simple pre-filtration step significantly enhances water clarity before boiling or chemical treatment, improving both the aesthetics and effectiveness of subsequent purification methods.
#16 – Bandana Water Strainer
Implement the sequential filtering technique to repurpose a cotton bandana as a multi-stage water filtration tool. First, pre-filter water through the single-layer bandana to remove larger debris.
Next, fold the bandana into quarters and repeat filtration to capture finer particles. Wet the bandana first to activate cotton fibers’ natural adhesive properties for maximum effectiveness and enhanced particle capture. Note: some of the newer bandanas aren’t all cotton, so they don’t work as well.
This simple approach removes visible contaminants while improving water clarity before final purification, though additional treatment remains essential to eliminate microbiological and chemical hazards.
#17 – Tampon Water Filter
Unwrap and expand the compressed cotton material to convert an unused tampon into a surprisingly effective emergency water filter. The resulting cylindrical filter contains densely packed cotton fibers arranged specifically to capture particles while allowing water flow—almost identical to commercial filter design.
Insert this improvised filter into a bottleneck or funnel, then slowly pour contaminated water through. The expanded cotton effectively removes sediment, debris, and some larger organisms. Though biological pathogens and chemical contaminants remain, this improvisation improves water clarity before final treatment.
#18 – Plastic Wrap Condensation Collector
Construct a ground-based solar still using plastic wrap stretched over a collection pit. Dig a hole approximately 2 feet deep and 3 feet wide, placing a collection container at the center bottom.
Cover the entire opening with plastic wrap, sealing the edges with soil. Place a small stone at the center, directly above your container, creating a depression in the plastic. As ground moisture and plant material in the hole heat, water vapor rises, condenses on the plastic underside, and drips into your container. This passive system works continuously in sunlight, producing small, consistent water quantities.
#19 – Pine Needle Water Disinfection
Utilize the natural antimicrobial properties of pine needles to create a basic water treatment solution in wilderness settings. Gather approximately one cup of fresh, green pine needles, preferably from white pine species (identified by needles growing in clusters of five).
Finely chop or crush the needles to release their essential oils, then add to one quart of water brought to a boil. Maintain a rolling simmer for 20 minutes, allowing the naturally occurring alpha-pinene compounds to permeate the water.
These compounds demonstrate moderate antibacterial and antiviral properties, reducing biological contaminants when commercial purification methods remain unavailable.
The resulting tea provides small amounts of vitamin C while masking unpleasant flavors from other water sources. While not wholly purified, this method offers supplementary treatment when combined with boiling or other techniques.
#20 – Hollow Reed Shallow Straw
Harvest a section of a hollow plant stem (such as bamboo, phragmites reed, or elder branches with the pith removed) to access water sources too shallow or narrow for conventional collection.
Select a reed approximately 12-18 inches long with intact cell walls and a clear interior channel. Insert one end into the water source while applying suction to the opposite end, drawing water through capillary action assisted by negative pressure.
This technique allows accessing water from tree crotches, rock crevices, or shallow depressions where conventional collection proves impossible, though contamination risk increases with this direct-consumption approach.
Fire Hacks
Fire is humanity’s original survival technology—a transformative tool that fundamentally altered our evolutionary trajectory. In survival scenarios, fire provides more than psychological comfort; it delivers temperature regulation, water purification, food preparation capabilities, predator deterrence, and signaling options.
Despite this critical importance, fire-starting remains among the most challenging survival skills to master, particularly under adverse conditions. The conventional wisdom of carrying multiple fire-starting tools—ferrocerium rods, lighters, matches—represents sound preparation.
However, when these primary methods become lost, damaged, or depleted, the ability to improvise fire-starting techniques from available materials becomes invaluable. The approaches outlined here leverage basic scientific principles—friction, chemical reaction, solar concentration, and electrical ignition—to create embers or flames using commonly available items.
Remember that successful fire-building involves much more than ignition. Proper preparation of tinder, kindling gradation, and fuel arrangement often determines whether a successful ignition transforms into a sustainable fire.
When utilizing these improvised methods, invest additional effort in fire lay preparation, as the resulting ignition sources typically produce shorter-duration or lower-intensity initial flames than conventional methods.
#21 – Steel Wool and Battery Fire Starter
Connect steel wool to both terminals of a standard battery to generate reliable emergency fire ignition. The fine steel filaments provide minimal resistance to electrical current, causing rapid heating to combustion temperature.
Use the finest grade “0000” steel wool for optimal results, as it ignites more readily than coarser alternatives. Battery selection affects performance—9-volt batteries provide ideal terminal spacing, though any battery from AA to car batteries will function with proper connection technique. The resulting flame burns briefly but intensely, requiring a prepared tinder for successful fire transfer.
#22 – Chapstick/Cotton Ball Fire Starter
Thoroughly saturate cotton balls with petroleum-based lip balm to create remarkably effective fire-starting material. The cotton fibers provide extensive surface area and serve as wick material, while the petroleum jelly offers prolonged burn time through slow fuel consumption.
An adequately prepared cotton ball can sustain flame for over 4 minutes, providing ample time to ignite progressively larger kindling. Store prepared balls in waterproof containers for emergency use.
This hybrid material combines the benefits of both components—the cotton ignites easily with spark-based fire starters, while the petroleum provides sustained high-temperature combustion.
#23 – Potato Chip Fire Starter
Utilize potato chips’ high-fat content as an unexpected fire-starting material. The combination of dehydrated potato substrate and cooking oil creates a highly combustible material that ignites readily and burns with surprising intensity.
Chips with higher fat content (particularly kettle-cooked varieties) perform best. Crush several chips into a loose pile to increase surface area, then apply an ignition source. The resulting flame burns with sufficient intensity to ignite additional kindling materials. This approach proves especially valuable when conventional tinder materials become dampened, as the hydrophobic oil content resists ambient moisture absorption.
#24 – Lint and Vaseline Fire Starter
Combine dryer lint with petroleum jelly to create waterproof, long-burning fire-starting material. The lint’s high surface area and fiber composition make it exceptionally receptive to ignition, while the petroleum jelly extends burn time from seconds to minutes.
Thoroughly work the petroleum jelly into the lint fibers until saturated but not dripping. The resulting material ignites with minimal spark and burns with sufficient intensity and duration to ignite even marginally damp kindling. For field use, store it in waterproof containers or wrap it in aluminum foil to prevent contamination of other gear.
#25 – Candy Wrapper Fire Starter
Metallic candy wrappers can be transformed into solar ignition devices through proper folding techniques. Chocolate bar wrappers with aluminum foil backing work best. Clean the wrapper, then fold it into a parabolic shape resembling a satellite dish.
This curvature concentrates solar energy at the focal point. Position the tinder at this focal point while aiming the reflective surface directly at the sun. With proper alignment, the concentrated solar energy can reach temperatures exceeding 300°F—sufficient to ignite charred material or extremely fine tinder. This method requires direct sunlight but functions effectively even in cold environments.
#26 – Lens Fire Starters
Repurpose optical lenses from damaged binoculars, cameras, or eyeglasses as solar fire-starting tools. Remove the lens element from its housing, then use it to focus sunlight onto a small point on your prepared tinder bundle.
Adjust the distance between the lens and tinder for maximum effectiveness until the smallest, brightest light spot forms. Larger diameter lenses collect more light energy, achieving higher temperatures at the focal point.
With proper technique, ignition typically occurs within 30 seconds in full sunlight. Unlike chemical or friction methods, this approach can be used repeatedly without resource depletion.
#27 – Broken Light Bulb Fire Starter
Salvage the filament assembly from a broken incandescent light bulb to create a spark-generating fire starter. Carefully extract the tungsten filament and supporting wires from the glass remnants.
Connect the filament assembly to a battery by touching the contact points to the positive and negative terminals. The tungsten wire heats instantly to over 2000°F, providing sufficient temperature to ignite fine tinder material placed in direct contact.
This method requires minimal physical effort compared to friction-based approaches, though it necessitates a functional battery and careful preparation to avoid injury from broken glass.
#28 – Gum Wrapper Battery Fire
Initiate fire using the conductive properties of metallic gum wrappers combined with battery power. Trim the wrapper to create an hourglass shape approximately 1/4 inch wide at the center narrowing.
When the wider ends contact the battery terminals, electrical current concentrates at the narrow center section, causing rapid heating to combustion temperature. Position fine tinder directly against the narrowest section before connecting the circuit. This method works most effectively with foil-backed paper wrappers rather than all-foil types, as the paper component provides initial fuel for sustained combustion.
#29 – Fire from a Bow and Drill
Employ the ancient friction-based fire-starting method using improvised materials. Construct a bow from a flexible branch approximately 2 feet long and a shoelace or cord.
Create your drill from a straight, dry hardwood stick about 8 inches long and 3/4 inch diameter. For the fireboard, select a flat, dry softwood piece. Carve a small depression in the fireboard, then use the bow to rotate the drill within this depression rapidly.
The friction generates wood dust and eventually sufficient heat for ember formation. Transfer the ember to the prepared tinder. While equipment-free, this method requires significant practice and proper technique to achieve consistent results.
#30 – Friction Fire with a Belt
Generate fire using the friction between a leather belt and a dry wooden edge. Select a thoroughly dried softwood board with a sharp 90-degree edge. Rapidly pull a leather belt back and forth across this edge, applying downward pressure to maximize friction.
Position the tinder directly beneath the contact point to catch the generated wood dust. After sustained effort (typically 5-10 minutes), the accumulated friction heat ignites the wood dust, creating a small ember that can be transferred to your prepared tinder bundle. This method requires significant physical exertion and proper technique but uses commonly available materials.
Food Hacks
While the survival rule of threes places food acquisition far below immediate shelter and water concerns, sustained emergency situations eventually require caloric intake to maintain physical capability and cognitive function.
The human body can survive weeks without food, but performance degradation begins much sooner. After approximately 72 hours without caloric intake, physical strength diminishes, decision-making becomes impaired, and the psychological stress of hunger affects morale.
The improvisational food acquisition techniques presented here operate from a critical assumption: in genuine survival situations, conventional food aesthetics and preference restrictions become secondary to safely obtaining calories and essential nutrients.
These approaches emphasize caloric return versus energy expenditure—prioritizing methods that deliver the greatest nutritional benefit while requiring minimal resource investment.
Remember that improper food harvesting or preparation represents a significant danger. Misidentified plants, improperly prepared animal proteins, or contaminated food sources can transform a challenging situation into a medical emergency.
These techniques assume basic knowledge of safe wild edibles in your region and fundamental food safety principles. The survival maxim applies when uncertainty exists: “When in doubt, go without.”
#31 – Soda Can Fishing Lure
Craft an effective fishing lure from an empty aluminum beverage can. Cut a 1-inch by 3-inch strip from the can’s side, then fold it repeatedly until the aluminum fatigues and breaks cleanly.
Shape the rectangle into a fish-like profile with tapered head and flared tail sections. Use a nail or knife point to punch a small hole near the head for line attachment. The reflective surface mimics fish scales underwater, while the thin metal creates fish-attracting vibration when retrieved with slight jerking motions. This improvised lure proves particularly effective for predatory species like bass, pike, and trout in clear water conditions.
#32 – Plastic Bottle Fish Trap
Construct a passive fish harvesting device from a discarded plastic bottle. Cut the top third of the bottle off at the shoulder, then invert this section and insert it back into the bottom section, securing with cordage through punctured holes.
The resulting funnel creates a one-way entrance that fish can swim into but struggle to exit. Place bait inside the trap, then submerge in slow-moving water with the entrance facing downstream.
Secure the trap to prevent loss during water level changes. This hands-free fishing method allows the simultaneous pursuit of other survival priorities while fish are captured automatically.
#33 – Pantyhose Snare
Nylon pantyhose can be repurposed into small-game snares by cutting them into strips and creating slip knots. The material’s elasticity provides automatic tension when triggered, while the smooth surface allows easy tightening.
Position these snares along observed small animal pathways, securing the fixed end to stable anchor points. The unique advantage of pantyhose snares lies in their ability to hold captured animals without cutting into tissue—potentially keeping prey alive longer and minimizing meat damage. Additionally, the material’s strength-to-weight ratio exceeds many alternative cordage options, allowing the construction of numerous traps from a single pair.
#34 – Duct Tape Fly Paper
Create insect harvesting surfaces using the adhesive side of duct tape. Cut strips approximately 2 inches wide by 12 inches long, then suspend them from branches near insect activity centers—particularly around standing water or flowering plants.
As insects land on the sticky surface, they become trapped, creating a passive protein harvesting system. After sufficient accumulation, remove adhered insects, then roast briefly over the fire to neutralize potential pathogens before consumption. While providing minimal calories individually, insects offer exceptional protein density and require little processing effort compared to larger game.
#35 – Coffee Can Smoker
Construct a miniature food preservation system from a metal coffee can. Puncture several small ventilation holes in the can’s bottom, then create a removable lid that fits securely.
Place small wood chips (preferably hardwood) in the can’s bottom, then position a small rack made from green sticks or metal above these chips. Light the wood chips, allowing them to smolder rather than flame, then place thin strips of meat on the rack before sealing with the lid. The resulting smoke infusion both preserves the meat through antibacterial compounds and enhances flavor.
#36 – Orange Peel Cup
Citrus fruit peels can be used as biodegradable food and beverage containers in survival situations. Carefully cut the fruit in half around its equator, then gently separate the pulp from the peel, keeping the peel halves intact.
The natural oils in citrus peels provide antimicrobial properties, making them more sanitary than many alternatives found in wilderness settings. The rigid structure maintains shape when filled with hot liquids, while the natural curvature creates a comfortable drinking edge. After use, these containers decompose naturally, minimizing environmental impact and eliminating cleaning requirements in water-scarce situations.
#37 – Plastic Bag Solar Cooker
Transform a dark-colored plastic bag into a passive cooking system using solar thermal principles. Place food items requiring cooking (particularly starchy vegetables like potatoes) inside a black plastic bag, then expel excess air before sealing.
Position the bag on a dark surface in direct sunlight, ideally on heat-absorbing material like dark rocks. The greenhouse effect created within the sealed bag elevates internal temperatures to 160-180°F in full sun conditions—sufficient for slow cooking many foods over 4-6 hours. This method requires no fuel consumption and generates no smoke, though cooking times exceed conventional methods.
#38 – Tin Can Cooking Pot
Add a wire bail handle to an empty tin can to transform it into a versatile cooking vessel. Select a can with intact seams and no interior coating (which may release toxins when heated).
Thread wire through holes punched near the top rim on opposite sides to create a handle. The resulting pot effectively boils water, prepares soup, and reheats pre-cooked foods.
To increase stability on uneven surfaces, create a tripod stand by bending three metal objects of equal length (nails, wire sections, etc.) and securing them around the can’s base with additional wire.
#39 – Belt Fishing Stringer
After successful harvesting, convert a leather or synthetic belt into a fish transportation system. Thread the belt through the fish’s gill opening and out the mouth, then secure the fish by buckling the belt or tying it off.
As additional fish are caught, add them to the same belt using identical techniques, positioning them alongside previous catches. This approach keeps harvested fish contained during continued fishing efforts while allowing them to remain in water between catches, preserving freshness. The belt material also provides the necessary strength to support the weight of multiple fish during transportation back to your preparation area.
#40 – Pop Top Fish Hook
You can transform the aluminum pull-tab from beverage cans into functional fishing hooks through simple modification. Separate the pull-tab from the can, then use a knife to shape one end into a point.
Bend the tab to create the characteristic hook shape, then use a heated nail or similar object to puncture a small eye at the top for line attachment. While less durable than commercial hooks, these improvised versions prove sufficiently strong for most small to medium-sized fish species. The reflective aluminum surface also serves as a basic attractor, potentially eliminating the need for separate lures or bait in some fishing scenarios.
First Aid Hacks
Medical emergencies during survival situations present uniquely challenging circumstances. Professional care becomes unavailable precisely when injury risks increase dramatically.
Without access to conventional medical resources, the ability to improvise effective treatments from available materials becomes a genuinely life-saving skill set. The approaches outlined here acknowledge a fundamental reality: improvised medical care rarely matches clinical standards but may provide sufficient intervention to prevent condition deterioration until proper care becomes available.
These techniques address common wilderness injuries, including wounds, burns, sprains, and minor infections. However, they cannot replace professional medical training or proper first aid supplies.
Carry a well-stocked first aid kit and obtain wilderness first aid training before venturing into remote areas. Consider these improvisational techniques as supplements to proper preparation rather than replacements.
Remember that improper medical treatment can sometimes cause more significant harm than the original injury. Apply these techniques only when necessary, and evacuate to professional care as soon as possible. The primary goal of wilderness first aid remains unchanged regardless of available resources: stabilize the patient sufficiently to enable safe evacuation to definitive care.
#41 – Duct Tape Bandage
Applying duct tape as an improvised wound closure system when traditional bandaging is unavailable. Clean the wound thoroughly for straight lacerations, then approximate the edges by pulling the surrounding skin together.
Apply strips of duct tape perpendicular to the wound, leaving small gaps between strips to allow drainage. For larger wound areas, create a butterfly closure effect by placing adhesive on both sides of the wound and then drawing the sections together.
Duct tape’s waterproof nature provides environmental protection while maintaining wound approximation. When possible, change dressings daily to prevent maceration of underlying tissue.
#42 – Sanitary Napkin Bandage
Repurpose feminine hygiene products as highly effective wound dressings during emergencies. Modern sanitary napkins feature a multi-layer design engineered explicitly for fluid absorption and retention—characteristics identical to medical-grade dressings.
The individually wrapped packaging maintains sterility until use, while the adhesive backing facilitates secure placement without additional materials. For significant bleeding, apply direct pressure with the absorbent side against the wound.
Secure the pad over the affected area for ongoing wound care and change it regularly to prevent infection. The high absorption capacity proves particularly valuable for injuries with substantial exudate.
#43 – Honey Antiseptic
When commercial antiseptics remain unavailable, use honey’s natural antimicrobial properties as an improvised wound treatment. Raw, unprocessed honey contains hydrogen peroxide, high sugar concentration, and complex compounds that inhibit microbial growth while promoting healing.
Apply a thin layer directly to cleaned wounds, then cover with available bandaging material. Reapply every 24 hours after gentle wound cleaning. The osmotic effect draws lymph fluid to the wound surface, naturally cleansing the area while maintaining a moist healing environment. Honey’s slightly acidic pH also creates unfavorable conditions for many pathogenic organisms.
#44 – Tampons for Nosebleeds
Employ the expansive absorbency of tampons to effectively manage epistaxis (nosebleed) emergencies. Remove the tampon from its applicator, then gently insert the compressed cotton into the affected nostril.
The material expands upon contact with blood, creating pressure against capillary beds while absorbing excessive flow. Leave in place for at least 30 minutes before gentle removal. If bleeding persists, replace it with a fresh tampon.
The sterile packaging and highly absorbent design make tampons superior to many improvised alternatives for this specific application, particularly for severe or recurrent nosebleeds that respond poorly to external pressure.
#45 – Credit Card Splint
Transform a plastic card into an effective finger splint for suspected fractures or severe sprains. Position the card along the affected finger, ensuring it extends from the fingertip to beyond the lowest knuckle for proper immobilization.
Secure at multiple points using available wrapping material—adhesive tape, strips of cloth, or bandannas work effectively. The semi-rigid plastic provides adequate stabilization while accommodating the finger’s natural curvature.
For enhanced effectiveness, sandwich the injured finger between two cards before securing. This approach prevents both lateral and vertical movement of the injured digit, allowing initial healing without functional compromise of adjacent fingers.
#46 – Dental Floss for Sutures
Dental floss can be used as an improvised suture material for wound closure in extreme emergencies when evacuation to medical care remains impossible. Waxed floss provides superior handling characteristics and knot security compared to unwaxed alternatives.
Thoroughly clean both the wound and floss with available antiseptic (alcohol, iodine, etc.) before the attempt. Create simple interrupted sutures approximately 1/4 inch from wound edges at 1/4 inch intervals.
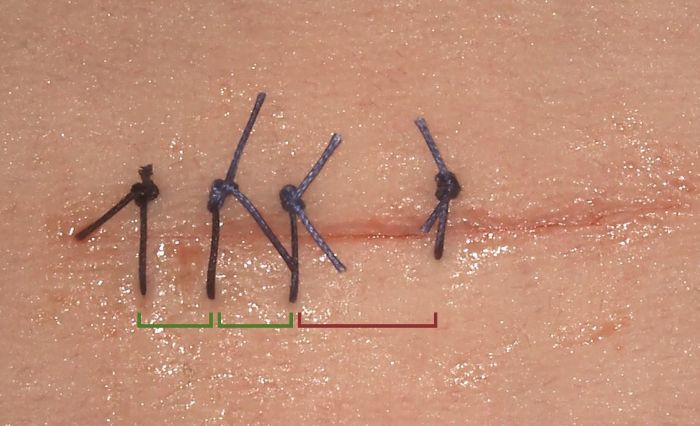
Tie square knots with additional throws for security. This approach should only be implemented for wounds that absolutely require closure when professional care remains unavailable for extended periods.
#47 – Chewing Gum for Toothaches
Apply softened sugar-free chewing gum directly to damaged teeth or exposed dental nerves as temporary pain management. The malleable material conforms to irregular surfaces, creating a protective barrier against temperature changes and mechanical stimulation—primary triggers of dental pain.
Peppermint varieties provide additional benefits through natural anesthetic properties. For maximum effectiveness, ensure the affected area is cleaned of debris before application, then soften the gum thoroughly before gentle placement over the damaged region. While not addressing underlying dental issues, this approach can significantly reduce acute pain until professional treatment becomes available.
#48 – Tea Bag for Burns
Harness tea bags’ tannic acid and antioxidant properties to treat minor burns and sunburn. Begin by cooling the burned area with clean water (never ice), then apply a moistened, cooled tea bag directly to the affected skin.
Tannic acid helps draw heat from the burn while reducing inflammation, and antioxidants support tissue healing. Black tea varieties work most effectively due to their higher tannic acid content.
For larger burn areas, create a compress by soaking several tea bags in cool water and applying the liquid with a clean cloth. This method provides both pain relief and potential infection prevention during the critical initial burn treatment phase.
#49 – Aluminum Foil as a Sling
Construct an emergency arm sling using standard aluminum foil’s unique combination of malleability and structural strength. Fold a length of foil repeatedly along its length to create a band approximately 2 inches wide and 4-6 layers thick.
This technique significantly increases load-bearing capacity while maintaining flexibility. Shape the reinforced band into a loop sized to support the injured arm, then twist the ends together for security.
Position the sling to hold the affected arm at approximately 90 degrees across the body. Unlike fabric slings that may stretch under continuous load, aluminum maintains its shape while providing consistent support to the injured limb.
#50 – Superglue for Cuts
Apply cyanoacrylate adhesive (superglue) as an emergency wound closure method for clean, straight lacerations with minimal bleeding. After thorough wound cleaning, carefully approximate the edges and apply a thin layer of adhesive directly to the surface, avoiding introducing it into the wound itself.
Hold edges together for approximately 60 seconds until initial bonding occurs. The resulting seal provides waterproof protection while maintaining wound edge approximation similar to professional butterfly closures.
This approach proves particularly valuable for locations experiencing constant flexion where traditional bandages frequently fail, though it should be avoided for jagged wounds, punctures, or wounds showing signs of infection.
Navigation represents perhaps the most underappreciated survival skill—until one becomes disoriented in unfamiliar territory. The ability to determine direction, maintain orientation, and effectively travel toward safety often makes the critical difference between a brief misadventure and a life-threatening ordeal.
While modern technology provides unprecedented navigational precision through GPS devices, these electronic aids inevitably fail precisely when needed most—batteries deplete, devices break, or signals become unavailable.
The improvisational navigation techniques presented here rely on fundamental natural principles that remain constant regardless of technological availability. You can maintain directional awareness even without specialized equipment by understanding basic astronomical patterns, natural indicators, and simple mathematical relationships.
These approaches have guided human movement for thousands of years before the invention of the magnetic compass, let alone satellite navigation. Remember that improvised navigation typically provides general directional information rather than precise positioning.
These techniques work best when integrated with proper landscape interpretation and route selection—skills that require development through practice in non-emergency situations. When venturing into unfamiliar terrain, always carry redundant navigation tools and ensure others know your intended route and expected return time.
#51 – Watch as a Compass
Solar positioning can convert an analog wristwatch into a basic directional instrument. In the Northern Hemisphere, hold the watch horizontally and point the hour hand directly at the sun.
South lies precisely halfway between the hour hand and the 12 o’clock position (using standard time). In the Southern Hemisphere, point the 12 o’clock position at the sun, and north lies halfway between 12 and the hour hand.
This method provides approximate cardinal directions during daylight hours, with accuracy diminishing near solar noon and at extreme latitudes. To implement the same technique, digital watch users can visualize an analog face superimposed on their digital display.
#52 – Needle and Leaf Compass
Magnetize an ordinary sewing needle to create a functional compass when commercial alternatives remain unavailable. Repeatedly stroke the needle in one direction against silk, wool, or even through your hair—approximately 50 strokes transfer sufficient electromagnetic charge to establish polarity.
Then, carefully place the needle on a small piece of leaf or bark floating in still water. The magnetized needle gradually aligns with Earth’s magnetic field, with the repeatedly stroked end pointing north. For improved performance, pre-magnetize several needles before wilderness travel, storing them with opposite poles separated to maintain polarity strength for emergency use.
Determine precise cardinal directions using the sun’s movement and a simple vertical stick. Place a straight stick approximately 3 feet tall vertically during morning hours on level ground.
Mark the tip of the shadow cast with a stone or twig. Wait at least 15 minutes (longer periods increase accuracy), then mark the new shadow tip position. Draw a straight line connecting these points—this line runs precisely east-west, with the first mark representing west and the second mark east. A perpendicular line drawn through the stick’s base provides the north-south axis. This technique works regardless of hemisphere or season.
#54 – Bright Cloth Trail Markers
Establish a reliable back-tracking system using small pieces of brightly colored material secured regularly along your travel route. Select material with high contrast against the surrounding environment—orange surveyor’s tape proves ideal, though any bright cloth serves adequately.
Attach markers at consistent intervals approximately 50 feet apart, ensuring each marker remains visible from its adjacent markers. Position indicators at natural decision points such as trail junctions or terrain transitions. This system enables confident backtracking even in low-visibility conditions, leaving minimal environmental impact if biodegradable materials are selected.
Tool Hacks
The modern understanding of human evolution increasingly emphasizes our species’ unique relationship with tools—we are fundamentally tool-makers and tool-users. This relationship becomes particularly evident during survival situations, where tools’ availability and quality dramatically impact physical capabilities and psychological resilience.
Modern survival contains an inherent irony: we’ve become surrounded by potential tool components while simultaneously losing the knowledge to repurpose them effectively. The improvisational tool techniques presented here aim to bridge this gap, transforming common objects into functional tools that address core survival needs.
These approaches apply basic mechanical principles to available materials, creating implements that extend human capabilities in critical areas, including cutting, securing, fastening, and carrying. While improvised tools rarely match the efficiency or durability of their purpose-built counterparts, they provide sufficient functionality to address immediate needs.
Remember that effective tool improvisation begins with recognizing an object’s fundamental properties rather than its intended purpose. For example, a paperclip represents potential spring tension and rigid wire rather than simply a document fastener.
A plastic bottle offers waterproof containment, transparent material, and structural rigidity rather than just beverage storage. This materials-first perspective forms the foundation of effective survival improvisation.
#55 – Concrete Friction Can Opener
Access canned food resources without conventional tools by utilizing the abrasive properties of concrete or rough stone surfaces. Begin by thoroughly cleaning the selected surface to remove potential contaminants.
Invert the can, pressing the sealed edge firmly against the concrete while applying slight downward pressure. Using a circular motion, grind the can’s crimped edge against the rough surface for approximately 2-3 minutes, periodically checking progress.
This friction gradually thins the metal seal until the lid’s vacuum breaks—indicated by a subtle hissing sound. Once the seal breaks, continue grinding until the edge appears significantly worn, then carefully pry the lid using a spoon handle or similar implement.
This technique effectively preserves the can contents while minimizing the risk of jagged edges compared to knife or rock puncture methods during emergency food access scenarios.
#56 – Belt Lever
Utilize the structural properties of a leather belt to increase mechanical advantage when moving heavy objects. For objects too heavy for direct lifting, wrap the belt around the item, creating a secure loop with the buckle positioned for easy gripping.
This approach transfers force across the belt’s length while the leather’s natural durability accommodates significant load. Alternatively, thread the belt through or around the object, then wrap the free end around a sturdy branch or pipe to create a windlass effect, generating a substantial mechanical advantage. This technique proves particularly valuable for moving rigid objects like logs or stones when constructing emergency shelters.
#57 – Shoelace as Rope
Repurpose durable shoelaces as multi-purpose cordage in survival situations. Modern synthetic laces offer surprising tensile strength—often supporting more than 200 pounds when properly deployed.
It is used for shelter lashing, gear bundling, snare construction, and emergency repairs. For maximum effectiveness, avoid loading shoelaces at sharp angles, which creates stress concentration points.
When additional length becomes necessary, join multiple laces using square knots or sheet bends, which maintain approximately 80% of the original strength. Unlike many improvised cordage alternatives, shoelaces provide consistent diameter, predictable stretch characteristics, and resistance to environmental degradation—making them ideal emergency cordage.
#58 – Tin Can as a Knife
Craft a cutting implement from a tin can lid through careful shaping and handle construction. Select a can with a relatively thick wall, then use existing tools to carefully separate the lid.
Create a handle section by folding one portion of the lid several times for reinforcement, wrapping this section with available material (tape, cordage, cloth) to prevent hand injury.
The remaining exposed edge provides cutting capability comparable to a medium-duty utility knife. This improvised tool functions effectively for cordage cutting, food preparation, and notching tasks, though it requires frequent resharpening through abrasion against rock surfaces.
#59 – Plastic Bottle as a Funnel
Remove the bottom section of a standard plastic beverage bottle to convert it into a precise liquid transfer tool. Invert the bottle, allowing the threaded neck to serve as the funnel’s narrow output while the cut bottom creates a wide intake surface.
For improved flow control, retain the original cap and puncture it with appropriately sized holes depending on the desired flow rate. This adaptation proves particularly valuable for transferring water between containers, adding fuel to small-mouthed vessels, or directing collected rainwater into storage. The transparency allows flow monitoring, while the rigid construction maintains shape during use.
#60 – Coins as Screwdrivers
Employ the rigid edge and consistent thickness of coins as improvised screwdriver bits when conventional tools remain unavailable. Select a coin matching the screw slot width—pennies work effectively for medium-slotted screws, while quarters accommodate larger fasteners.
Apply firm downward pressure while turning to prevent slippage. Most modern coins’ copper-nickel composition provides sufficient hardness for occasional use without significant deformation.
For improved torque application, sandwich the coin between two additional coins, aligning the edges to create a “T” handle configuration. This approach proves particularly valuable for accessing battery compartments or emergency equipment secured with simple fasteners.
#61 – Wire Hanger Multi-Tool
A standard wire clothes hanger can be transformed into a versatile survival tool through strategic reshaping. Straighten the hanger completely, then create specialized implements at each end.
Bending the final inch back 180 degrees forms a small hook at one end, useful for retrieving items from tight spaces, improvised fishing, or suspending gear from branches.
Shape the opposite end into a flattened scraper by hammering the wire until it widens, then sharpening one edge on an abrasive surface. The remaining length provides a rigid probe, pot handle extension, or makeshift skewer.
Incorporate multiple bends at precise intervals for increased versatility, creating measurement guides for shelter construction or trap setting. The high-tensile steel wire maintains structural integrity under significant load while remaining light enough for field carry, making this adaptation remarkably useful across diverse survival applications from food acquisition to equipment repair.
#62 – Aluminum Foil as a Sharpener
Use crumpled aluminum foil’s mild abrasive properties to restore dull blades’ cutting edges. Fold a sheet of standard household foil multiple times to create an approximately 2-inch square with 6-8 layers.
Firmly crumple this section to create an irregular surface with numerous edges and points. Draw the dull blade across this surface at the appropriate sharpening angle (typically 20-30 degrees) for approximately 10-15 strokes per side.
The aluminum’s hardness effectively removes microscopic burrs and realigns the cutting edge without removing significant blade material—making this approach ideal for field maintenance rather than primary sharpening.
#63 – Paperclip as a Lock Pick
Manipulate a standard paperclip into a functional lock bypass tool for emergency access to simple pin-tumbler locks. Straighten the paperclip completely, then create a small hook at one end by bending the final 1/8 inch at a 90-degree angle.
Insert the straight portion into the lock’s bottom keyway while applying slight rotational pressure with a second tool (another paperclip, thin screwdriver, etc.). Use the hooked end to manipulate individual pins until the lock cylinder rotates.
While requiring practice for reliable implementation, this technique provides emergency access to many residential and commercial locks when keys become lost or locked inside secured areas.
#64 – Duct Tape for Repairs
Deploy duct tape’s unique combination of aggressive adhesive and reinforced backing to execute emergency repairs across diverse materials. For fabric tears, apply strips to both sides of the damaged area, overlapping the tear by at least one inch in all directions.
For hose or pipe leaks, wrap multiple layers, spiraling away from the leak site in both directions, creating a compression seal. To repair broken tool handles, make a splint by aligning the broken sections and wrapping with alternating spiral and longitudinal tape layers. Quality duct tape’s waterproof nature and temperature stability ensure that repairs maintain integrity across varying environmental conditions.
Signaling and Communication Hacks
In survival scenarios, rescue often depends less on your physical capabilities than on your ability to effectively communicate your presence and location to potential rescuers. Signaling represents the critical bridge between self-sufficiency and external assistance—converting an isolated survival situation into a rescue operation.
Despite its importance, signaling typically receives minimal attention in survival preparation, creating a critical capability gap when communication becomes crucial.
The improvisational signaling techniques presented here emphasize three fundamental principles: contrast, movement, and recognition of patterns. Effective signals must stand out against the surrounding environment, incorporate motion elements that capture attention, and utilize internationally recognized distress indicators that clearly communicate emergency status.
These approaches require minimal equipment while maximizing detection probability across various environmental conditions and distances. Remember that signaling efforts should balance visibility against resource conservation.
Deploy passive signals (ground markers, flags, reflectors) continuously while reserving active signals (smoke, fire, whistles) for moments when potential rescuers likely operate in your vicinity. This strategic approach maximizes both detection probability and operational duration when resources remain limited.
#65 – Mirror Signaling
Harness reflected sunlight to create high-visibility emergency signals that are visible for miles under favorable conditions. Any reflective surface—compact mirrors, polished metal, chrome vehicle components, or even ice—can generate effective signals.
Hold the reflective surface close to your eye, then create a “V” with your opposite hand fingers, positioning potential rescuers between these fingers. Slowly move the reflection across your targeting fingers until it aligns with the receiver position.
Flash in patterns of three—the international distress pattern—to distinguish your signal from random reflections. This technique can attract attention from aircraft up to 10 miles distant under optimal conditions.
#66 – Whistle from a Leaf
Craft an audible signaling device from a suitable leaf demonstrating moderate rigidity. Select a leaf approximately 3-4 inches long, then hold it tightly between your thumbs, positioning the leaf edge perpendicular to your mouth with a small gap between your thumbs.
Blow forcefully through this gap, causing the leaf to vibrate between your thumbs like a reed instrument. Adjust thumb pressure and positioning until a clear tone emerges. This improvised whistle generates sounds that carry significantly farther than the human voice—particularly in dense vegetation—while requiring minimal physical exertion compared to shouting. Pattern your sounds in groups of three to indicate emergency status.
#67 – Aluminum Can Antenna
Enhance radio reception on emergency frequencies by creating an improvised antenna extension from an aluminum beverage can. Thoroughly clean and dry the can, then carefully cut away the bottom section using available tools.
Make a small hole in the remaining section’s center, then pass your radio’s existing antenna through this hole. The aluminum creates a conductive surface that effectively increases the antenna’s receiving surface area.
For maximum effectiveness, position the open end of the can toward the likely direction of potential signals. This simple modification can increase the reception range by 15-40%, depending on the frequency and environmental conditions.
#68 – CD as a Signaling Device
Repurpose optical discs (CDs/DVDs) as highly effective emergency signaling tools leveraging their reflective properties. The metalized layer reflects sunlight with surprising efficiency across significant distances.
For maximum effectiveness, thread a short section of cordage through the center hole, allowing the disc to hang freely and rotate with air movement. This rotation creates a flashing effect that is substantially more visible than that of static reflectors.
Position multiple discs at different heights to maximize visibility across varied terrain. The distinctive circular shape and consistent flash pattern differentiate these signals from natural reflections, increasing recognition probability among search personnel familiar with improvised signaling techniques.
Cold Weather Hacks
Cold environments present perhaps the most immediately dangerous survival conditions, where the window between initial exposure and life-threatening hypothermia can close with alarming speed.
Even mild cold stress rapidly depletes energy reserves, impairs decision-making, and diminishes physical capability—creating a dangerous negative spiral in which each degree of cooling further reduces one’s ability to address the situation effectively. In extreme cold, survival often hinges on quickly improvising effective insulation and heat generation solutions.
The improvisational cold-weather techniques presented here operate from three fundamental principles: trapping dead air spaces (insulation), preventing convective heat loss (wind protection), and maintaining core temperature through strategic heat application.
These approaches maximize thermal efficiency using commonly available materials, extending survival duration until more permanent solutions become available or rescue occurs.
Remember that cold-weather survival requires continuous, proactive intervention rather than reactive response. Implement these techniques before significant body heat loss occurs, as rewarming requires substantially more energy than maintaining the existing temperature. When resources remain limited, prioritize core body insulation over extremities, though monitor for frostbite risk in exposed areas.
#69 – Plastic Bags as Gloves
Create emergency hand protection using standard plastic bags to prevent heat loss and moisture exposure. Layer the bags in a specific sequence for maximum effectiveness: place a thin insulating material (paper, dry leaves, etc.) directly against the skin, then add the plastic bag layer, followed by an outer bag containing additional insulation if available.
This construction creates dead air spaces that trap body heat, while the waterproof barrier prevents convective cooling from wind and water exposure. Secure the bags at the wrist using cordage or tape to prevent cold air infiltration. While not providing dexterity for fine motor tasks, this approach effectively preserves hand warmth during inactive periods or sleep.
#70 – Hand Warmers from Steel Wool and Vinegar
Generate sustained heat through a controlled oxidation reaction between fine steel wool and white vinegar. Saturate a golf-ball-sized portion of 0000-grade steel wool with white vinegar, then squeeze to remove excess liquid.
Place this prepared material inside a ventilated container (perforated plastic bottle, metal can with holes, etc.). The chemical reaction produces heat for approximately 30-45 minutes as the acetic acid in vinegar accelerates steel oxidation.
Position these improvised warmers near major blood vessels (groin, armpits, neck) rather than extremities to maximize the core warming effect. Prepare multiple units for extended heating duration.
#71 – Emergency Blanket from a Car Sunshade
Repurpose automotive windshield sunshades into effective emergency blankets, leveraging their reflective properties and substantial surface area. When positioned correctly, the aluminized material reflects up to 90% of radiated body heat back toward the source.
For maximum effectiveness, wrap the shade around your torso, with the reflective surface facing inward toward your body. Secure with cordage, tape, or by tucking the edges under your body weight.
The pliable nature of most sunshades allows folding into smaller configurations to concentrate heat around vital core areas when the material remains insufficient for full-body coverage. This approach provides significantly greater thermal protection than equivalent weights of conventional materials.
#72 – Socks as Mittens
Spare socks can be converted into functional hand insulation when conventional gloves are unavailable. For basic implementation, simply place your hands inside clean, dry socks, using the heel pocket to accommodate your thumb.
For enhanced effectiveness, create a dual-layer system: wear a thin sock directly on each hand, then add larger outer socks over the first layer. This construction creates insulating air spaces between layers—the primary mechanism of thermal protection.
For extreme conditions, fill the space between layers with additional insulating material (paper, dry grass, etc.) to further increase thermal resistance. This approach sacrifices dexterity for superior thermal protection.
#73 – Body Heat Reflection with Aluminum Foil
Enhance sleeping system efficiency by incorporating aluminum foil as a radiant barrier beneath your body position. Lay multiple overlapping sheets of standard household foil on the ground, creating a continuous reflective surface slightly larger than your body dimensions.
Position your sleeping materials directly on this reflective layer. The foil prevents body heat from escaping into the environment (the primary heat loss mechanism during wilderness sleep) by reflecting thermal radiation back toward your body.
This simple addition increases sleeping system efficiency by approximately 20-30% regardless of available insulation quality, providing critical temperature regulation during overnight cold exposure.
#74 – Snow as Insulation
Utilize snow’s surprising insulating properties to create emergency shelter in winter environments. Contrary to intuition, properly deployed snow provides effective thermal protection due to its high air content when loose or slightly compacted.
For emergency shelters, pack snow to medium density (firm enough to maintain shape but not ice-hard) and create walls at least 12 inches thick. This construction provides insulation value approximately equivalent to fiberglass household insulation.
For expedient personal protection, excavate a trench in deep snow and cover it with branches and additional snow, creating a micro-shelter that maintains internal temperature significantly above ambient conditions.
#75 – Hot Water Bottle from Plastic Bottles
Create effective personal heating devices from standard plastic bottles filled with heated water. Select bottles with secure caps and no apparent damage or stress marks. Fill approximately 80% with water heated to just below boiling temperature, then securely seal.
Wrap the filled bottle in available cloth to prevent direct skin contact while providing gradual heat transfer. Position these thermal reservoirs near major blood vessels—particularly against the femoral arteries along the inner thighs—to maximize the core warming effect. A properly prepared 1-liter bottle provides approximately 3-4 hours of effective heat in moderate cold conditions.
Hot Weather Hacks
While cold environments present immediate survival threats, hot conditions often create more insidious dangers through progressive dehydration, electrolyte imbalance, and heat-related illnesses that develop gradually before manifesting as serious medical emergencies.
The human body’s thermal regulation system functions effectively within a narrow temperature range, and extended exposure to heat—particularly with limited water or exacerbated by physical exertion—rapidly depletes physiological reserves and cognitive capacity.
The improvisational hot-weather techniques presented here emphasize three critical principles: evaporative cooling (the body’s primary heat-regulation mechanism), reduced solar loading, and strategic activity management.
These approaches maximize cooling efficiency while minimizing water consumption—the fundamental equation determining survival duration in hot environments where water access remains limited.
Remember that heat-related emergencies typically develop progressively, creating a false sense of adaptation before rapid deterioration occurs. Implement these cooling techniques preemptively and continuously rather than in response to obvious overheating symptoms.
The most dangerous characteristic of heat emergencies remains the corresponding degradation in judgment that prevents effective self-rescue once conditions become severe.
#76 – Wet Bandana for Cooling
Leverage evaporative cooling principles to cool major blood vessels using a strategically dampened bandana. Thoroughly wet the bandana with available water, then wring until it is no longer dripping.
Fold into a band approximately 2-3 inches wide, then wrap around your neck, positioning the fabric directly over the carotid arteries running along either side of your throat.
As water evaporates from the fabric, it draws significant heat from the blood flowing through these surface vessels, effectively cooling your core temperature. Re-wet as needed, prioritizing this cooling method over less efficient alternatives like pouring water over your head or clothing.
#77 – Fan from Cardboard and Motor
Construct a functional electric fan by combining a small motor with improvised blades cut from rigid materials. Salvage a motor from damaged electronic devices (toys, cassette players, etc.) capable of operating on available power sources.
Create fan blades from rigid materials like plastic containers, aluminum cans, or heavy cardboard, cutting 3-4 identical blade shapes approximately 2-3 inches long. Attach these blades to a central hub secured to the motor shaft using wire, glue, or mechanical fasteners.
When properly constructed, the resulting device creates significant airflow, enhancing the evaporative cooling effect even when operating at low speeds from limited power sources.
#78 – Cooling with Evaporation
Harness evaporative cooling principles by suspending dampened fabric in airflow pathways. Thoroughly wet available fabric materials (sheets, clothing, towels), then hang vertically in doorways, windows, or other apertures where air naturally flows.
As moving air passes through the damp material, accelerated evaporation creates a cooling effect, reducing air temperature by 10-15°F under favorable conditions. For maximum effectiveness in shelters, position wet material on the windward side of all openings, creating a cooling effect throughout the entire space. This technique functions most effectively in low-humidity environments where evaporation occurs rapidly.
#79 – Terracotta Pot Cooler
Construct an electricity-free refrigeration system using two nested terracotta pots and the principle of evaporative cooling. Select two unglazed terracotta pots of different sizes—one approximately 2-3 inches larger in diameter than the other.
Place sand in the bottom of the larger pot, then center the smaller pot inside. Fill the gap between pots with sand, then saturate the sand with water until completely damp but not dripping.
Cover the nested pots with a damp cloth and place them in a shaded, breezy location. As water evaporates from the sand, it draws heat from the inner chamber, creating a cooling effect that can reduce internal temperatures by 15-20°F below ambient conditions.
This improvised refrigeration system—known traditionally as a zeer pot—maintains temperatures around 40°F in dry climates. It can preserve perishable foods for days without electricity and requires only periodic water replenishment to maintain the cooling effect.
#80 – Wet Sock Cooler
Use wet socks to implement targeted evaporative cooling for the body’s primary heat exchange surfaces. Select cotton socks for maximum water absorption, then thoroughly saturate with available water.
Place one damp sock directly against the back of your neck, covering the cervical spine region where blood vessels run close to the skin surface. Use the second sock as a rotating replacement, keeping it in the shade to maintain a lower temperature.
The combination of evaporative cooling and direct conductive heat transfer from the cooler material effectively reduces core temperature while using minimal water compared to full-body cooling techniques.
Bug Out Hacks
The concept of “bugging out”—rapidly evacuating from danger toward predetermined safer locations—represents a foundational element of comprehensive preparedness. While properly equipped bug-out bags with carefully selected gear constitute the ideal approach, emergencies frequently occur without warning, forcing rapid evacuation with only immediately available resources.
The ability to improvise essential capabilities during these unexpected departures often determines whether the evacuation succeeds or creates additional complications. The improvisational bug-out techniques presented here emphasize four critical priorities: rapid resource collection, protected transportation, accessibility during movement, and security from opportunistic threats.
These approaches transform common household items into functional equivalents of purpose-designed evacuation tools, enabling effective movement away from danger even without proper pre-positioning of specialized equipment.
Remember that successful evacuation relies more on advanced planning and knowledge than specific gear. Predetermined evacuation routes, rally points, and destination options represent non-material preparations that frequently prove more valuable than physical equipment. Even with limited resources, clear planning significantly increases the probability of evacuation success compared to reactive, unplanned movement.
#81 – Pillowcase as a Bug Out Bag
Repurpose an ordinary pillowcase into an adequate emergency container for evacuation essentials. The cotton construction provides surprising strength—capable of supporting 15-20 pounds without failure—while the wide opening facilitates rapid loading during time-critical evacuations.
Create a shoulder strap by tying cordage or a belt through diagonal corners, distributing weight more effectively than hand-carrying. Bundle similar items in smaller containers (zip-lock bags, smaller cloth pouches) before placing them inside the main pillowcase for improved organization. This approach allows quickly gathering critical supplies when purpose-built containers remain unavailable, using materials present in virtually all residential settings.
#82 – Hidden Compartment in a Shoe
Modifying standard footwear can create a concealed storage location for emergency cash, identification documents, or critical small items. For most athletic shoes, carefully peel back the insole from the heel section, then cut a small pocket in the underlying foam using a sharp knife.
Size the cavity to accommodate folded paper currency, copies of identification, emergency contact information, or small survival tools. Replace the insole, using small adhesive dots at corners if necessary to prevent movement.
This approach positions emergency resources in an item you’re almost certainly wearing during evacuation scenarios, ensuring critical materials remain continuously available regardless of other carried equipment.
#83 – Duct Tape Gear Securing
Utilize small pre-cut duct tape sections to secure loose equipment quickly during emergency movement. Prepare these attachment points in advance by cutting the tape into 4-6 inch strips and folding each strip back on itself at one end to create a non-sticky pull tab.
Attach these prepared strips to various equipment pieces with the pull tab accessible. During evacuation, quickly secure gear to your person by removing the backing and attaching it to clothing.
This approach prevents critical equipment loss during movement without requiring specialized attachment hardware or time-consuming improvisation during high-stress situations. The pre-positioned tape adds negligible weight while providing a significant functional advantage when rapid movement becomes necessary.
#84 – Water Bottle as a Flotation Device
Convert empty plastic bottles into emergency personal flotation support for water crossings during evacuation. Standard 1-liter bottles provide approximately 2.2 pounds of buoyancy when sealed, and multiple bottles offer sufficient flotation to support an adult.
Secure bottles under each armpit using cordage, clothing, or duct tape, positioning them to maintain your airways above water level with minimal effort. Distribute bottles around your torso for improved performance rather than concentrating them at a single point.
This approach enables safer traversal of water obstacles during evacuation routes, particularly valuable when established crossings become compromised, or flooding restricts movement along primary routes.
#85 – Altoids Tin Can First Aid Kit
Construct a compact but comprehensive medical kit using an Altoids mint tin as the container. The hinged metal case provides impact protection while maintaining minimal dimensions suitable for pocket carry.
Stock with individually wrapped alcohol pads, adhesive bandages in multiple sizes, antibiotic ointment packets, over-the-counter pain relievers, and medical tape wrapped around a small card.
If space permits, include a small multi-tool with scissors. This ultra-portable medical capability ensures basic treatment options remain available throughout evacuation movements, addressing minor injuries before they potentially compromise your continued mobility during emergency relocation.
Self-Defense Hacks
Personal security concerns often increase dramatically during emergencies as social order becomes compromised and resource competition intensifies. While proper self-defense preparation ideally includes both training and appropriate tools, unexpected situations frequently require improvisation using immediately available objects.
Recognizing and deploying effective defensive options from everyday items may create critical response capacity when conventional defensive tools remain unavailable.
The improvisational self-defense techniques presented here emphasize three fundamental principles: extension of reach, concentration of force, and target disruption.
These approaches transform everyday objects into functional defensive tools by leveraging basic physics principles—converting ordinary items into defensive resources through proper application rather than intrinsic design. While improvised options rarely match purpose-designed defensive tools, they provide a significant advantage compared to unarmed responses.
Remember that effective self-defense focuses primarily on creating disengagement opportunities rather than causing injury. The goal in most confrontations should be creating sufficient disruption to enable safe withdrawal rather than continued engagement. Even with effective improvised tools, escape and avoidance typically represent the optimal response when possible.
#86 – Keys as a Weapon
Through proper grip and deployment techniques, you can transform your everyday keyring into an effective defensive tool. Select the longest, most rigid key from your set, then position it between your middle and index fingers, with the remainder of the keyring secured in your palm.
This configuration concentrates force into a small impact surface while extending your effective striking range by several inches. Target vulnerable areas, including eyes, throat, and facial features, to create maximum disruptive effect with minimal force application.
Unlike purpose-designed weapons that may face legal restrictions, keys remain innocuous everyday items available in virtually all situations while providing significant defensive capability when properly deployed.
#87 – Hairspray as Pepper Spray
Utilize aerosol hairspray as a temporary defensive deterrent in emergency situations. Standard hairspray contains multiple chemical irritants that, when sprayed directly into an assailant’s face, cause immediate eye irritation, respiratory discomfort, and disorientation sufficient to create escape opportunities.
For maximum effectiveness, direct the spray from a distance of 2-3 feet, aiming specifically at the eyes and upper respiratory area. The resulting discomfort typically lasts 3-5 minutes, providing adequate time for withdrawal from the confrontation.
This approach repurposes a common personal care product found in many households, vehicles, and accommodations into an effective defensive option requiring no special training to deploy effectively.
#88 – Belt as a Whip
Deploy a standard leather belt as a defensive impact tool to maintain distance from potential threats. Remove the belt quickly by pulling from the opposite side of the buckle, then grip the non-buckle end firmly, allowing the buckle to hang freely as the striking element.
This configuration creates an improvised flail with approximately 3 feet of striking range. The dense metal buckle concentrates force at the impact point, while the flexible leather section generates acceleration through proper swing mechanics.
For maximum effectiveness, use horizontal sweeping strikes rather than overhead movements, which provide greater range and speed while remaining less predictable to the target.
#89 – Pen as a Weapon
Proper selection and grip technique can convert an ordinary writing instrument into an effective close-quarters defensive tool. Choose pens constructed from rigid materials (metal bodies are preferred over plastic), preferably with textured surfaces to maintain grip under stress.
Hold using an ice-pick grip—pen body extending from the bottom of your closed fist—rather than the standard writing position. This configuration allows delivering concentrated force into small target areas while maintaining the pen’s structural integrity during impact.
Target pressure points, including the shoulder joint, the base of the neck, or hands, to create functional disability without permanent injury, enabling disengagement from the confrontation with minimal force application.
#90 – Book as a Shield
Utilize hardcover books as improvised defensive shields against edged weapon attacks or blunt force trauma. The compressed paper structure effectively absorbs and disperses impact energy, particularly against slashing attacks.
Hold the book with both hands, covering your torso’s centerline with the outward hardcover. For maximum protection, select larger books with rigid covers and secure binding.
This defensive implementation provides surprisingly effective protection against many common attacks while using resources available in numerous environments. When combined with active movement rather than stationary defense, this approach significantly reduces injury probability during unexpected confrontations where purpose-designed protective equipment remains unavailable.
#91 – Sand as a Blinding Agent
Deploy readily available granular materials as visual disruption tools during confrontations. Loose sand, dirt, salt, pepper, or similar materials thrown directly toward an assailant’s face cause immediate visual impairment and disorientation without causing permanent injury.
Keep small amounts of these materials readily accessible in pockets or containers for immediate deployment when threats develop. The resulting temporary blindness typically lasts 30-60 seconds—providing sufficient opportunity for escape while requiring minimal strength to deploy effectively.
This approach proves particularly valuable for individuals with limited physical capabilities facing stronger adversaries, as it constructs equalization through sensory disruption rather than physical force.
#92 – High Heels as a Weapon
Transform women’s high-heeled shoes into effective impact weapons when conventional defensive tools remain unavailable. Remove the shoe, then grip the body portion firmly while positioning the heel outward as the striking surface.
The concentrated force delivered through the relatively narrow heel tip generates significant pressure even with moderate swing force. When facing extreme danger requiring maximum response, target areas that are vulnerable to impact disruption, including the temple, throat, or eyes.
This improvised option provides substantial defensive capability using an item frequently present but rarely recognized for its potential protective application during threatening encounters where more conventional options aren’t accessible.
Survival Gardening Hacks
Food security during extended emergencies frequently transitions from simple consumption of stored resources to sustainable production systems. While wilderness survival scenarios typically emphasize short-term food acquisition through foraging and hunting, longer-duration emergencies often require implementing basic agricultural capabilities.
The ability to establish productive growing systems using limited resources and improvised materials may determine long-term outcomes when commercial food systems remain disrupted.
The improvisational gardening techniques presented here focus on four critical components: starting seeds, delivering water efficiently, maximizing growing space, and protecting developing plants.
These approaches transform common household items into functional equivalents of specialized gardening equipment, enabling food production even when conventional materials become unavailable.
While improvised systems rarely match the productivity of properly designed agricultural setups, they provide sufficient yield to supplement other food sources during extended emergencies.
Successful survival gardening emphasizes caloric efficiency and essential nutrient production rather than dietary variety. Focus growing efforts on high-yield, easily cultivated crops appropriate for your climate zone rather than attempting to replicate normal dietary preferences. The objective is to maintain basic nutrition rather than culinary satisfaction during challenging circumstances.
#93 – Egg Carton Seed Starters
Transform discarded cardboard egg cartons into effective seed-starting containers that maximize limited resources. The individual compartments perfectly accommodate single seeds while providing adequate soil volume for initial growth.
The cardboard material absorbs excess moisture while allowing necessary air exchange through its porous structure. When seedlings develop sufficient size for transplanting, cut the compartments apart and plant directly into the soil—the cardboard decomposes naturally while eliminating transplant shock.
This approach proves particularly valuable for early-season growing when outdoor temperatures remain unsuitable for direct seeding. Cover the filled carton with clear plastic for enhanced germination, creating a miniature greenhouse effect until sprouting occurs.
#94 – Plastic Bottle Watering System
Construct an efficient drip irrigation system using discarded plastic bottles. The system delivers precise water amounts directly to plant root zones. Using a heated nail, puncture several small holes in the bottle cap.
Bury the bottle neck-down adjacent to your plant, leaving the bottom section exposed above soil level. Fill with water through the exposed bottom, creating a reservoir that gradually releases moisture through the cap perforations into the root zone.
This method reduces water consumption by up to 70% compared to surface watering by eliminating runoff and evaporation loss—a critical advantage during water-restricted emergency scenarios. Connect bottles using small tubing sections for multiple plants to create an integrated irrigation network from a single filling point.
#95 – Trash Can Rain Barrel
Convert a standard plastic trash can into an effective rainwater harvesting system that collects substantial irrigation reserves during precipitation events. After thoroughly cleaning the interior, position the container beneath roof downspouts or rain gutters.
Create a simple debris filter by stretching window screen material across the opening and securing it with cordage or a bungee cord. For controlled dispensing, install a spigot near the bottom by drilling an appropriately sized hole and sealing it with waterproof adhesive.
This system typically collects 0.6 gallons per square foot of roof area during a 1-inch rainfall—potentially harvesting 50+ gallons from modest roof sections. The resulting water reserve provides crucial irrigation capacity during drought or when municipal systems fail.
#96 – Vertical Gardening with Gutters
Repurpose discarded rain gutters into space-efficient growing channels that maximize production in limited areas. Mount gutter sections horizontally along walls or fence surfaces, creating multiple growing tiers separated by 12-18 inches vertical spacing.
Drill drainage holes at 12-inch intervals along the bottom surface, then fill them with the appropriate growing medium. This configuration proves ideal for shallow-rooted crops, including lettuce, spinach, radishes, and herbs—producing significant edible yield from a minimal horizontal footprint.
The elevated positioning reduces pest pressure while improving ergonomics during planting and harvesting. To enhance water retention, install end caps on gutter sections, creating small reservoirs extending intervals between irrigation requirements during water-restricted scenarios.
#97 – Newspaper Pots
Create environmentally friendly growing containers from recycled newspapers that eliminate transplant shock while maximizing limited resources. Fold newspaper sheets around a cylindrical form (juice can, wine bottle, etc.), creating container walls approximately 3-4 inches tall.
Fold the bottom section inward to create a stable base, then remove the form. These biodegradable containers hold soil effectively while allowing air exchange through the porous paper structure.
When seedlings reach transplant size, place the entire newspaper pot directly into garden soil, where it decomposes naturally while providing additional organic material. This approach eliminates expensive commercial containers while reducing root disturbance during transplanting—a critical advantage for stress-sensitive crops like cucumbers, squash, and melons that typically suffer significant productivity loss from traditional transplanting techniques.
Home Security Hacks
Property security frequently becomes a significant concern during prolonged emergencies as social order experiences disruption and resource competition intensifies.
While comprehensive security ideally involves community cooperation and professional systems, improvised approaches can provide basic protection when conventional options become unavailable. The ability to implement effective security measures using readily available materials may prevent property loss or personal injury when formal protection systems fail.
The improvisational security techniques presented here emphasize three fundamental principles:
- intrusion detection,
- psychological deterrence,
- and access control.
These approaches transform common household items into functional security elements by focusing on early warning capabilities rather than physical confrontation.
While improvised systems cannot match the effectiveness of professional security installations, they provide a significant advantage over completely unsecured spaces during challenging circumstances.
Remember that effective security begins with operational security—minimizing external indicators of resource availability to prevent becoming a preferential target. The best security scenario often involves appearing less favorable for opportunistic targeting rather than implementing obvious defensive measures that may inadvertently advertise resource availability.
#98 – DIY Security System with String and Cans
Establish a rudimentary perimeter alarm system using cordage and empty metal containers that provide reliable intrusion notification without power requirements. Secure one cordage end to a rigid support, then attach multiple metal cans containing a few small stones or metal objects at intervals along the line before securing the opposite end to another fixed point.
Position this assembly across likely approach paths at ankle height, creating an audible alarm when contacted. For expanded coverage, create multiple triggered lines at various heights and positions.
This system provides effective early warning during both day and night conditions without requiring active monitoring, allowing appropriate responses to potential threats before a direct confrontation occurs.
#99 – Hidden Valuables in Plain Sight
Implement effective resource concealment using the psychological principle of camouflage through context—hiding significant items by transforming their appearance into expected environmental elements.
Create false containers from modified everyday objects:
- hollow out books,
- install false bottoms in kitchen canisters,
- or convert functional electrical outlets into hidden storage spaces.
The effectiveness lies not in sophisticated locking mechanisms but in cognitive blindness—even searching individuals typically overlook items that match expected environmental patterns.
Create multiple distributed caches rather than centralized storage for critical resources to ensure partial resource preservation even if some locations are discovered. This approach secures important supplies without advertising protective measures that might inadvertently attract additional attention.
#100 – Gravel Perimeter for Noise
Establish an effective acoustic security zone by installing a 3-foot-wide strip of coarse gravel around critical approach paths to your shelter. Select larger-diameter stones (3/4 to 1 inch) rather than fine gravel to maximize noise generation during compression.
This passive security measure functions continuously without power requirements or maintenance, providing early warning through distinctive crunching sounds when traversed.
The psychological impact additionally creates a deterrent effect, as potential intruders recognize the impossibility of a silent approach. For maximum effectiveness, combine with vegetation clearance around the perimeter zone, eliminating potential concealment areas while creating clear lines of sight. This layered approach provides both visual surveillance capability and audible warning with minimal resource investment.
#101 – Broken Glass Bottle Perimeter
Implement a substantial psychological deterrent by visibly incorporating broken glass fragments into security perimeters. Carefully break colored glass bottles, then insert the fragments into wet concrete along wall tops or fence lines to create formidable physical barriers while providing a visual deterrent.
Position broken material in planters or containers near vulnerable entry points for less permanent installations. The primary security value derives not from actual injury capability but from strong psychological deterrence—few opportunistic intruders willingly risk lacerations to access uncertain rewards.
This approach additionally provides visual confirmation of security consciousness, often redirecting potential threats toward less protected alternatives. Always clearly mark these areas to prevent accidental injury to authorized individuals during routine movement or emergency evacuation.
The 101 improvisational techniques presented in this guide represent more than a collection of clever survival tricks—they embody a fundamental mindset shift essential for navigating unexpected emergencies.
By developing the ability to see beyond objects’ intended purposes to their potential applications in crisis scenarios, you cultivate perhaps the most valuable survival skill: adaptability.
Remember that these improvised approaches serve as critical bridges between immediate challenges and more sustainable solutions. No amount of clever makeshift tools replace proper preparation, appropriate training, and purpose-designed equipment.
However, when primary systems fail—as they inevitably do during genuine emergencies—these improvised alternatives may provide the crucial margin between mere survival and catastrophe.
The actual value of studying these techniques extends beyond the specific applications described. Each represents a thinking pattern—a way of analyzing problems by breaking them into fundamental principles, then applying available resources to address core needs.
This process—assessing requirements, inventorying resources, improvising solutions, and refining through testing—creates a transferable mental framework applicable to countless emergency scenarios.
As you incorporate these concepts into your preparedness strategy, consider practicing select techniques during non-emergency conditions. The cognitive stress accompanying actual emergencies significantly impairs complex problem-solving capability precisely when innovation becomes most crucial.
Practicing improvisation beforehand transforms theoretical knowledge into practical skill, developing neural pathways that remain accessible even under extreme duress.
Genuine resilience emerges not from individual capability but through community connection. Throughout human history, the most successful survival scenarios have involved cooperative effort rather than isolated heroics.
Share these skills with family and community members, creating mutual capability networks that exponentially increase collective resilience during challenging circumstances.
By mastering the art of improvisation while simultaneously building conventional preparedness, you create layered resilience—the capacity to withstand and adapt to unpredictable disruptions while maintaining core functionality.
This adaptive capability may prove the most valuable skill set in an increasingly complex and interdependent world where conventional systems face mounting pressures from all sides.